Your Cart is Empty


From transposition and quantization to extreme sound design, Ableton’s Warping functionality is extremely powerful. Find out how to harness it.
Manipulating the playback timing of recorded audio has been a technique used by music makers for decades. The Elektronische Music and Music Concrete experimental music movements that started in the 1940s and ’50s were based on the manipulation of recorded sounds: often the slowing down and speeding up of analogue tape machines. In the ’60s, bands like The Beach Boys and The Beatles brought these techniques into the pop music domain, and they have remained — in one form or another — ever since.
The Warp Button: With Warping off, your sounds play exactly as they are recorded. Only with the Warp button ‘on’ (illuminated yellow) do you have access to all the pitch and tempo manipulation controls.

Warp Markers: A Warp Marker can be placed anywhere in an audio clip. Once created, that point (whether it’s a transient or not) can be dragged to any other position on the timeline between other Warp Markers. This results in the repositioning of the playback timing, allowing you to stretch and contort audio to your liking.
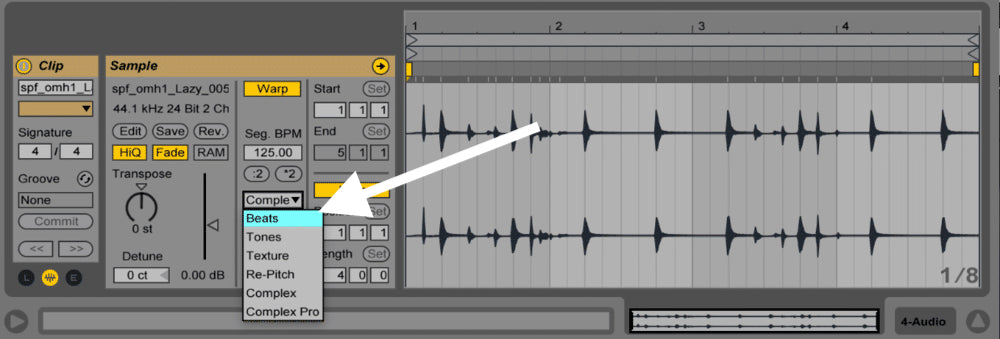
There are six different modes, optimized for different applications, from beats to tones and textures, and even full songs. Each mode has a different set of sub-controls, which lets you warp your audio in a multitude of ways.
Beats Mode: As the name suggests, this mode is designed for drums and other rhythmic patterns — this is because it prioritizes the preservation of transients, so you maintain a crisp and punchy sound. You can elect to ‘preserve’ the transients at beat subdivisions, such as quarter notes or 16ths. Alternatively, you can set it to preserve the transients detected by auto Warping, or manually entered by the user.
The final control in Beats mode lets you change the looping characteristics for each transient. You can choose not to loop — leaving silence after segments if pitched up, or cropping if pitched down — or loop forward, or loop forward then reverse. The Envelope control lets you crossfade between the snippets: a setting of 100 applies no fade; 0 is the maximum setting.
Tones Mode: Ableton recommends using tones mode for “stretching material with a more or less clear pitch structure, such as vocals, monophonic instruments and basslines”. In this mode, there is only one control — for changing the size of the grains of audio. This isn’t an absolute figure; the Warping algorithm actually tweaks this setting dependent on the audio in question. It’s best to experiment here, but you will find that the highest grain settings leads to audible snippet repeats (which could be cool!).
Texture Mode: Similarly to Tones mode, Texture Mode has a control for grain size adjustment. However, Ableton doesn’t consider the audio content and leaves the grain size as you set it. The other control, ‘Fluctuation’ (marked ‘Flux’), is a randomness control. The more Flux, the more randomness. Ableton recommend Texture Mode for “sound textures with an ambiguous pitch contour, [such as] polyphonic orchestral music, noise, atmospheric pads, etc.”
Re-Pitch Mode: This mode will be familiar to vinyl DJs, where adjustments to the speed of the turntable affect the speed and the pitch of a record at the same time. Transpose and Detune controls are disabled in this mode, as Re-pitch Mode takes the replay speed information from the master tempo.
Complex Mode: Designed for full songs with a mixture of rhythmic and tonal content, it’s much more taxing on your computer processor load. But it’s a better choice for polyphonic material than Beats, Tones or Texture Modes.
Complex Pro: The most CPU-intensive Warp Mode, Complex Pro, gives you control over formant preservation. At the highest setting, the original formants will be maintained in warped audio, which is desirable when you want to transpose the audio and maintain it’s tonal quality. Reducing the extent to which formants are preserved will result in a tonal shift in the audio, which can make for some interesting results. The Envelope control in this mode affects the spectral make-up of the audio. Ableton suggest that low-pitched material often sounds better with higher Envelope settings; high-pitched is better with a lower Envelope setting.
Now you have got to grips with the controls, here’s some tips on how to practice using Ableton’s Warping feature.
Swing Straight Beats: Let’s say you have a completely straight, un-swung four-four beat with off-beat hi-hats. In Beats Mode, Warp markers can be used to ‘pin’ the off beats slightly late on the groove to give the sample a swung feel. Just double-click on a transient and lock it to the timing in the clip until it sounds good. Note that attention should be paid to the precise positioning of the transients, as the auto-detection process can sometimes miss the subtle nuances of the early attack phase of certain sounds.
Prepare Full Songs For DJing: Using Ableton to DJ might be frowned upon by the strictly vinyl set, but it does give you the opportunity to use the software’s powerful mixer and plugin capabilities, as well as the plethora of hardware controllers like the Novation Launchpad or Ableton Push. When all your songs are warped, you can play them back at any tempo, and you can layer countless tracks at the same time, loop sections and make slick-sounding segues between genres. Warping takes time, especially for music not recorded to a click track like soul and funk. But once everything is warped, you can perform safe in the knowledge that you’ll never lose sync or trainwreck your mixes! Complex or Complex Pro modes are both designed for warping full songs with polyphonic material, but this is CPU intensive. If you find that you’re starting to max out your processor, consider using the Track Freeze function in Ableton.
Make Glitchy Rhythms From Sampled Audio: In Textures mode, you can make seemingly innocuous audio mutate into an unpredictable glitch fest very easily. Experiment with found sounds or lifted samples that last around 10-20 seconds, set the grain size high and experiment with the randomness control. Otherwise, switch to Beats Mode and set the Preserve control to 1/8ths, then drag your warp markers in extreme ways and try out the transient looping options. You’ll be sure to get some interesting results.